
In this blog, we will explore Kubernetes Labels and Selectors, how they are used to manage pods in Kubernetes, and practical examples using Labels and Selectors.
What are Labels on Kubernetes?
As the name says, Labels are identifiers that are attached to objects in Kubernetes such as pods, services, etc. Labels are key/value pairs, we assign each object with multiple labels.
Unlike a unique name given to an object, multiple objects can have the same labels which will be useful in grouping them.
For example:
labels:
  <key>: <value>
  app: webserver
  environment: production
  tier: frontend
Labels are not set by Kubernetes as default, the user who creates the object will be assigning Labels to each object.
What are Selectors on Kubernetes?
As the name says, Selectors are used to select objects based on their Labels.
Since multiple objects can have the same label we can select all the objects with the same Label by the Selectors.
There are two types of Selectors Equality-based and Set-based.
Equality-Based Selectors
Selectors select objects with the same label you specified in key-value pair.
For example, if you specify the key-value pair as app=webserver, equality-based selectors only select objects with webserver labels.
kubectl get pods -l app=webserverSet-Based Selectors
Selectors select objects if they have any one of the labels you specified in the set.
For example, assume you have specified the set as environment in (production, staging), if the objects have either one of the labels' production or storage it will be selected.
kubectl get pods -l 'environment in (production, staging)'Note: Set-based selectors are commonly used in advanced setups such as NetworkPolicies, ResourceQuotas, and affinity rules.
Creating pods with Labels
First, let's see about creating Pods with Labels.
In this example, we are going to create two pods with Labels using the following commands
k run frontend \
    --image=nginx \
    -l name=nginx,env=prod,tier=frontend,component=webserver

k run backend \
    --image=nginx \
    -l name=java,env=prod,tier=backend,component=appserver
Once you created the Pods using the command, run the following command to check the Labels
k get po --show-labelsYou will get the following output

Now, let's how we can use Selectors to query using Labels.
Querying Pods with Selectors
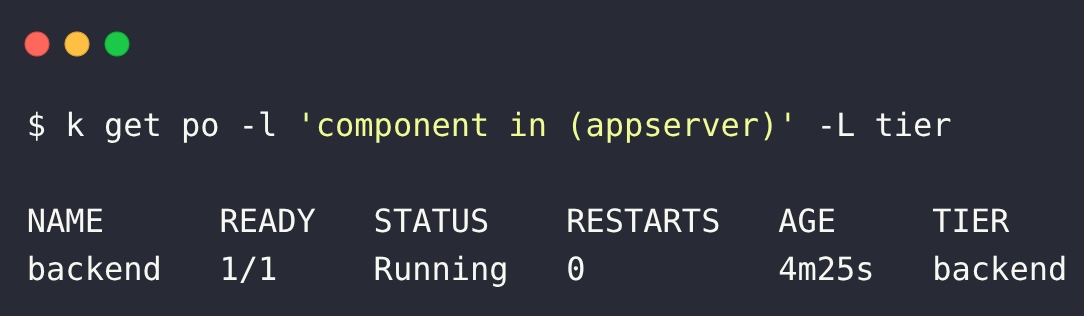
To show how a Selector query uses Labels, I am going to get the Pod with the Label component=appserver.
To find the Pod with the Labels component=appserver, run the following command
k get po -l 'component in (appserver)' -L tierYou will get the following output
Next, let's see how to add Labels to a Pod.
Adding, Modifying, and Deleting Labels
Add a New Label
Run the following command to add a new Label to the Pod
k label po frontend version=1.0.1Now, check the Labels of the Pod you can see a new Label has been added to the Pod frontend as shown below

Modify an Existing Label
If you want to modify the Labels, run the above command you used to add a Label with an --overwrite flag as given below
k label po frontend version=1.0.2 --overwriteIf you list the Pods now you can see the label has been altered as shown below

Delete a Label
You can delete any Label by specifying the Label name with a hyphen at the end, if you want to delete a Label run the following command
k label po frontend version-If you check the labels the version Labels have been deleted from the Pod frontend

Why Labels and Selectors Matter for CKA
Labels and Selectors are essential to nearly every Kubernetes resource and are commonly tested on the Certified Kubernetes Administrator (CKA) exam.
You will see them in:
- Pod management and troubleshooting
- Service discovery and traffic routing
- Deployments and ReplicaSets
- Node selection (affinity/anti-affinity rules)
Conclusion
In this blog, you learned about Kubernetes Labels, Selectors, and how to use them.
I believe this blog gives you a basic understanding of Kubernetes Labels and Selectors and how it works.
This is very important for CKA Certification exam. If you are preparing for CKA certification, make use of CKA coupon to save up to 47% on certification registration.