
Learn how to install Kubernetes with our 7 step guide. Perfect for beginners, this tutorial walks you through each step to get Kubernetes installed.
We will setup the Kubernetes clusters using the official Kubeadm utility. It makes the cluster configurations very easily.
Step 1: Create Two Servers
You need a minimum of two Ubuntu servers to create a Kubernetes clusters. These servers can be on your local workstation, cloud it bare metal servers. All you need is internet connection in the servers.
Servers should have a minimum of 2 vCPU and 2GB RAM.
- Server 01: Will act as Kubernetes Controller Plane
- Server 02: Will act as Kubernetes Worker node.
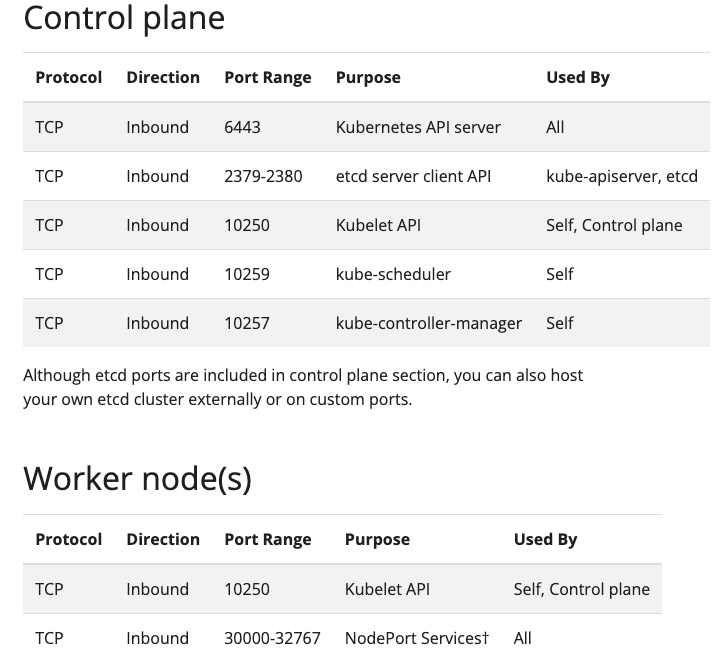
In both servers ensure the firewall is disabled and all the ports are allowed between the servers. Id you want restricted port access between the servers, enable all the recommended ports of control plane and worker nodes as given in the image below.
You can add more servers as workers nodes as per your requirements. The setup process will the same of all the worker nodes.
Notefollow this blog
Step 2: Install Essential Utilities on All Servers
Next step is to install the following utilities on all the servers.
- Container Runtime (CRI-O)
- kubelet
- Kubeadm
- kubectl
Also we will do some extra configurations required for Kubernetes.
To make things simpler, we have added all the steps as a shell script.
Save the following shell script as utilities.sh
#!/bin/bash

# Exit on error, undefined variable, or error in any pipeline
set -euxo pipefail

# Variables
KUBERNETES_VERSION="1.28.1-00"
OS="xUbuntu_22.04"
VERSION="1.28"

# Disable swap and keep it off during reboot
sudo swapoff -a
(crontab -l 2>/dev/null; echo "@reboot /sbin/swapoff -a") | crontab - || true

# Update package list
sudo apt-get update -y

# Install CRI-O Runtime
# Load required modules and set sysctl params
echo -e "overlay\nbr_netfilter" | sudo tee /etc/modules-load.d/crio.conf
sudo modprobe overlay
sudo modprobe br_netfilter

echo -e "net.bridge.bridge-nf-call-iptables=1\nnet.ipv4.ip_forward=1\nnet.bridge.bridge-nf-call-ip6tables=1" | sudo tee /etc/sysctl.d/99-kubernetes-cri.conf
sudo sysctl --system

# Add CRI-O to sources and install
echo "deb https://download.opensuse.org/repositories/devel:/kubic:/libcontainers:/stable/$OS/ /" | sudo tee /etc/apt/sources.list.d/devel:kubic:libcontainers:stable.list
echo "deb http://download.opensuse.org/repositories/devel:/kubic:/libcontainers:/stable:/cri-o:/$VERSION/$OS/ /" | sudo tee /etc/apt/sources.list.d/devel:kubic:libcontainers:stable:cri-o:$VERSION.list

curl -L https://download.opensuse.org/repositories/devel:kubic:libcontainers:stable:cri-o:$VERSION/$OS/Release.key | sudo apt-key --keyring /etc/apt/trusted.gpg.d/libcontainers.gpg add -
curl -L https://download.opensuse.org/repositories/devel:/kubic:/libcontainers:/stable/$OS/Release.key | sudo apt-key --keyring /etc/apt/trusted.gpg.d/libcontainers.gpg add -

sudo apt-get update
sudo apt-get install -y cri-o cri-o-runc

sudo systemctl daemon-reload
sudo systemctl enable crio --now

echo "CRI runtime installed successfully"

# Install Kubernetes components
sudo apt-get update -y
sudo apt-get install -y apt-transport-https ca-certificates curl
curl -fsSLo /usr/share/keyrings/kubernetes-archive-keyring.gpg https://dl.k8s.io/apt/doc/apt-key.gpg

echo "deb [signed-by=/usr/share/keyrings/kubernetes-archive-keyring.gpg] https://apt.kubernetes.io/ kubernetes-xenial main" | sudo tee /etc/apt/sources.list.d/kubernetes.list > /dev/null
sudo apt-get update -y
sudo apt-get install -y kubelet="$KUBERNETES_VERSION" kubectl="$KUBERNETES_VERSION" kubeadm="$KUBERNETES_VERSION"

# Install jq and set Kubelet node IP
sudo apt-get install -y jq
local_ip=$(ip --json addr show eth0 | jq -r '.[0].addr_info[] | select(.family == "inet") | .local')
echo "KUBELET_EXTRA_ARGS=--node-ip=$local_ip" | sudo tee /etc/default/kubelet > /dev/null
Copy the script to all the servers.
Login as root. This script need root permissions to execute.
sudo suAdd executable permissions to the script using the following command.
chmod +x utilities.shExecute the script.
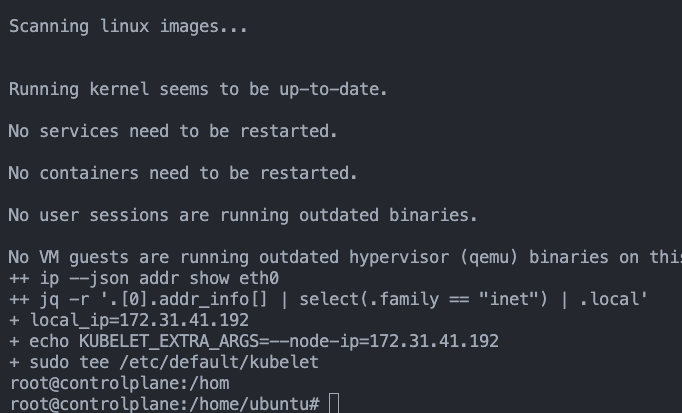
./utilities.shThe script will install and configure all the essentials for the Kubernetes cluster.
On a successful execution you will get the output as shown below.
Step 3: Create Kubeadm Configuration File
Next step is to create a Kubeadm YAML configuration file with all the required configurations for control plane.
Save the following YAML file as kubeadm.config in the control plane node. Replace 35.89.184.80 with the Public or Private IP of the control plane node.
apiVersion: kubeadm.k8s.io/v1beta3
kind: ClusterConfiguration
apiServer:
  certSANs:
    - 127.0.0.1
    - 35.89.184.80
  extraArgs:
    bind-address: "0.0.0.0"
scheduler:
  extraArgs:
    bind-address: "0.0.0.0"
controllerManager:
  extraArgs:
    bind-address: "0.0.0.0"
networking:
  podSubnet: "10.244.0.0/16"
  serviceSubnet: "10.96.0.0/12"
Step 4: Initialize Control Plane with Configuration File
Now, using kubeadm we will initial the control plane.
Excute the following kubeadm command in the control plane node where you have saved the kubeadm.config file.
kubeadm init --config=kubeadm.configOn a successful execution, you will get the following output show in the image below. Copy the join command and keep it in a notepad. We need the join command to be run on the worker nodes to join the master node.
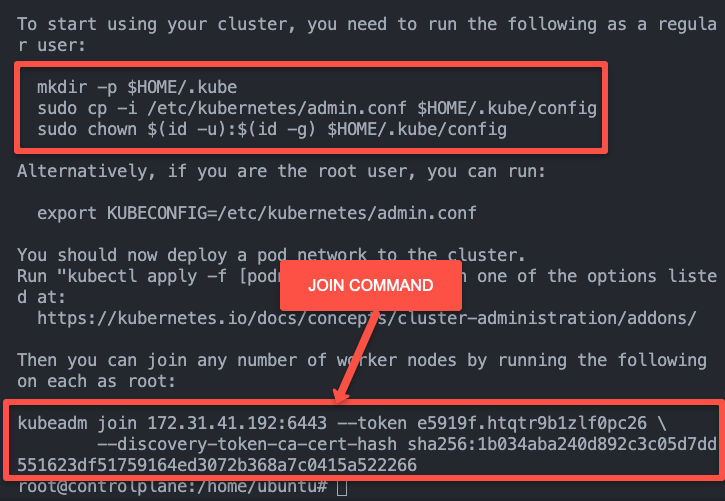
Execute the following to add the admin.conf file to the homefolder to use kubectl commands
mkdir -p $HOME/.kube
sudo cp -i /etc/kubernetes/admin.conf $HOME/.kube/config
sudo chown $(id -u):$(id -g) $HOME/.kube/config
Verify kubectl by executing the following command.
kubectl get pod -n kube-systemYou should see the output like below.
root@controlplane# kubectl get pod -n kube-system
NAME                                   READY   STATUS    RESTARTS   AGE
coredns-5dd5756b68-6t77f               1/1     Running   0          5m23s
coredns-5dd5756b68-gkbhp               1/1     Running   0          5m23s
etcd-controlplane                      1/1     Running   1          5m36s
kube-apiserver-controlplane            1/1     Running   0          5m39s
kube-controller-manager-controlplane   1/1     Running   0          5m38s
kube-proxy-2264s                       1/1     Running   0          5m23s
kube-scheduler-controlplane            1/1     Running   0          5m38s
root@controlplane:/home/ubuntu#
Step 5: Join the Worker Nodes To Control Plane
Now that the control plane is setup, we need to join the worker node to the control plan.
Execute the join command you noted down in the last step on the Worker nodes. It should look like the following.
kubeadm join 172.31.41.192:6443 --token e5919f.htqtr9b1zlf0pc26 \
        --discovery-token-ca-cert-hash sha256:1b034aba240d892c3c05d7dd551623df51759164ed3072b368a7c0415a522266
A successful output should look like the following
4oot@node01# kubeadm join 172.31.41.192:6443 --token e5919f.htqtr9b1zlf0pc26 \
        --discovery-token-ca-cert-hash sha256:1b034aba240d892c3c05d7dd551623df51759164ed3072b368a7c0415a522266

[preflight] Running pre-flight checks
[preflight] Reading configuration from the cluster...
[preflight] FYI: You can look at this config file with 'kubectl -n kube-system get cm kubeadm-config -o yaml'
[kubelet-start] Writing kubelet configuration to file "/var/lib/kubelet/config.yaml"
[kubelet-start] Writing kubelet environment file with flags to file "/var/lib/kubelet/kubeadm-flags.env"
[kubelet-start] Starting the kubelet
[kubelet-start] Waiting for the kubelet to perform the TLS Bootstrap...

This node has joined the cluster:
* Certificate signing request was sent to apiserver and a response was received.
* The Kubelet was informed of the new secure connection details.

Run 'kubectl get nodes' on the control-plane to see this node join the cluster.
Execute the following command on the control plane node to verify if the node has joined the cluster.
kubectl get nodesYou should see the following output.
oot@controlplane:/home/ubuntu# kubectl get nodes
NAME           STATUS   ROLES           AGE     VERSION
controlplane   Ready    control-plane   14m     v1.28.1
node01         Ready    <none>          6m22s   v1.28.1
Step 6: Validate the cluster
Lets do a smoke test and validate the cluster.
We have added all the commands you can use to validate the different aspects of the clusters.
| Command | Description |
|---|---|
kubectl get nodes | Check the status of nodes in the cluster. |
kubectl get pods --all-namespaces | Check if all pods are running or have successfully terminated. |
kubectl cluster-info | Get basic info about the cluster. |
kubectl get svc | Check services running in the default namespace. |
kubectl get componentstatuses | Check the status of cluster components like etcd, controller-manager, etc. |
kubectl api-resources | See all available API resources. |
kubectl config view | View kubeconfig settings. |
kubectl get events | See events such as scaling operations or errors. |
kubectl version | Check the version of the client and the server. |
Conclusion
In this blog we have looked at installing a Kubernetes cluster using simple steps and configurations.
Next you can try deploying applications on the cluster. Cluster setup is one of the important tasks in CKA Certification exam. If you are planning for CKA exam, don't forget to use voucher codes from Linux Foudnation Coupon page to save up to 35% on certification registration.