This guide explains the process of creating CA keys and certificates and uses them to generate SSL/TLS certificates & keys using SSL utilities like OpenSSL and cfssl.
Terminologies used in this article:
- PKI - Public key infrastructure
- CA - Certificate Authority
- CSR - Certificate signing request
- SSL - Secure Socket Layer
- TLS - Transport Layer Security
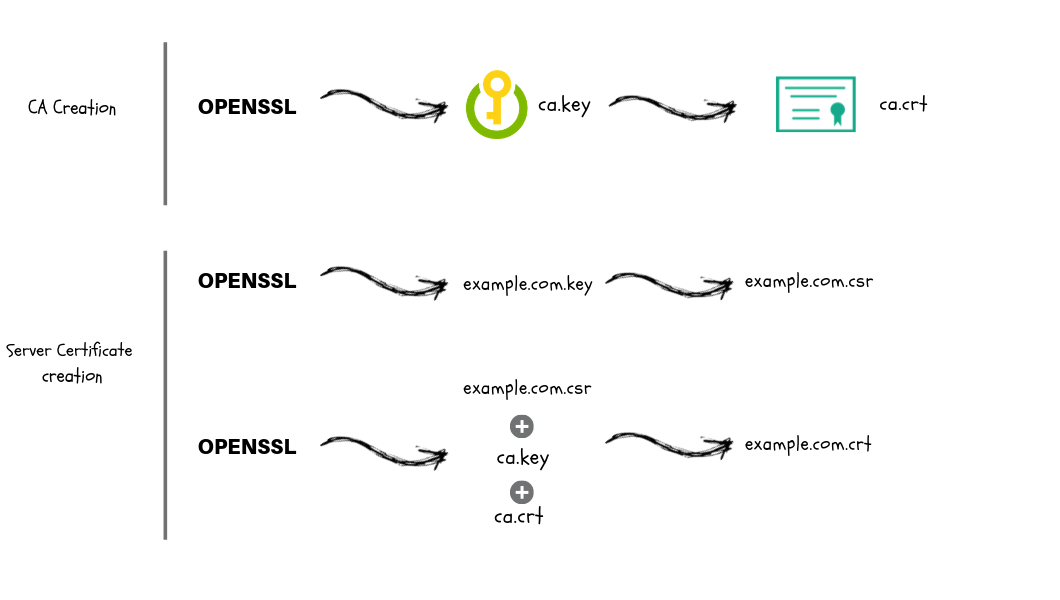
Certificate Creation Workflow
Following are the steps involved in creating CA, SSL/TLS certificates.
- CA Key and Certificate Creation
- Generate a CA private key file using a utility (OpenSSL, cfssl etc)
- Create the CA root certificate using the CA private key.
- Server Certificate Creation Process
- Generate a server private key using a utility (OpenSSL, cfssl etc)
- Create a CSR using the server private key.
- Generate the server certificate using CA key, CA cert and Server CSR.
Also Read: Types of SSL/TLS Certificates Explained
This guide explains the steps required to create CA, SSL/TLS certificates using the following utilities.
- openssl
- cfssl
This guide is focused on creating your own CA and SSL/TLS certificates. It is meant for development or to use within an organizational network where everyone can install the root CA certificate that you provide. For usage in public (internet) facing services, you should consider using any of the available third party CA services like Digicert etc.
Generating Certificates Using OpenSSL
Openssl utility is present by default on all Linux and Unix based systems.
Generate CA Certificate and Key
Step 1: Create a openssl directory and CD in to it.
mkdir openssl && cd opensslStep 2: Generate the CA private key file.
openssl genrsa -out ca.key 2048Step 3: Generate CA x509 certificate file using the CA key. You can define the validity period of the certificate in days. Here we have mentioned 1825 days.
The following command will prompt for the cert details like common name, location, country, etc.
openssl req -x509 -new -nodes \
  -key ca.key -sha256 \
  -days 1825 -out ca.crt
Or , you can pass these information in the command as well as shown below.
openssl req -x509 -new -nodes \
  -key ca.key -subj "/CN=scriptcrunch/C=US/L=CALIFORNIA" \
  -days 1825 -out ca.crt
Generate SSL/TLS Certificates
Step 1: Create a server private key
openssl genrsa -out server.key 2048Step 2: Create a configuration file named csr.conf for generating the Certificate Signing Request (CSR) as shown below. Replace the values as per your needs.
Note: alt_names should contain your servers DNS where you want to use the SSL. Also, add all the IPs associated with the server if clients connect using an IP instead of a DNS name.
cat > csr.conf <<EOF
[ req ]
default_bits = 2048
prompt = no
default_md = sha256
req_extensions = req_ext
distinguished_name = dn

[ dn ]
C = US
ST = California
L = San Fransisco
O = Scriptcrunch
OU = Scriptcrunch Dev
CN = scriptcrunch.com

[ req_ext ]
subjectAltName = @alt_names

[ alt_names ]
DNS.1 = scriptcrunch
DNS.2 = scriptcrunch.com
IP.1 = 10.34.12.5
IP.2 = 10.34.12.6
EOF
Step 3: Generate the CSR using the private key and config file.
openssl req -new -key server.key -out server.csr -config csr.confStep 4: Generate the server SSL certificate using ca.key, ca.crt and server.csr
openssl x509 -req -in server.csr -CA ca.crt -CAkey ca.key \
  -CAcreateserial -out server.crt -days 10000 \
  -extensions req_ext -extfile csr.conf
Generating Certificates Using CFSSL & CFSSLJSON
CFSSL and CFSSLJSON are PKI tools from Cloudflare. They simplify the process of generating CSRs and certificates.
Install CFSSL and CFSSLJSON on Linux
1. Download the executables and save it to /usr/local/bin
# For Linux AMD64
sudo curl -L https://github.com/cloudflare/cfssl/releases/download/v1.6.5/cfssl_1.6.5_linux_amd64 \
  -o /usr/local/bin/cfssl

 sudo curl -L https://github.com/cloudflare/cfssl/releases/download/v1.6.5/cfssljson_1.6.5_linux_amd64 \
  -o /usr/local/bin/cfssljson

sudo curl -L https://github.com/cloudflare/cfssl/releases/download/v1.6.5/cfssl-certinfo_1.6.5_linux_amd64 \
  -o /usr/local/bin/cfssl-certinfo
2. Add execute permissions to the downloaded executables.
sudo chmod +x /usr/local/bin/cfssl \
  /usr/local/bin/cfssljson \
  /usr/local/bin/cfssl-certinfo
3. Verify the installation by executing the cfssl command.
cfssl versionYou should see output showing the version information.
Generate CA Certificate and Key
Step 1: Create a folder named cfssl to hold all the certificates and cd into the folder.
mkdir cfssl && cd cfsslStep 2: Create a ca-csr.json file with the required information.
cat > ca-csr.json <<EOF
{
  "CN": "Demo CA",
  "key": {
    "algo": "rsa",
    "size": 2048
  },
  "names": [
    {
      "C": "US",
      "L": "California",
      "ST": "Milpitas"
    }
  ]
}
EOF
You can check the supported values for csr and config using the following commands.
cfssl print-defaults config
cfssl print-defaults csr
Step 3: Create the CA key and cert file (ca-key.pem & ca.pem ) using the ca-csr.json file.
cfssl gencert -initca ca-csr.json | cfssljson -bare ca -Step 4: Create a ca-config.json with signing and profile details. This will be used to create server or client certificates that can be used to set up SSL/TSL based authentication.
cat > ca-config.json <<EOF
{
  "signing": {
    "default": {
      "expiry": "8760h"
    },
    "profiles": {
      "web-servers": {
        "usages": [
          "signing",
          "key encipherment",
          "server auth",
          "client auth"
        ],
        "expiry": "8760h"
      }
    }
  }
}
EOF
Generate SSL/TLS Certificates
Step 1: Create a server-csr.json with your server details.
cat > server-csr.json <<EOF
{
  "CN": "scriptcrunch",
  "hosts": [
    "scriptcrunch.com",
    "www.scriptcrunch.com"
  ],
  "key": {
    "algo": "rsa",
    "size": 2048
  },
  "names": [
    {
      "C": "US",
      "L": "CA",
      "ST": "San Francisco"
    }
  ]
}
EOF
Note: hosts entry in the json should contain the server DNS or Public/Private IP address, hostnames, local DNS etc based upon the interface you want to receive the authentication requests. For example, you could have a server with TLS authentication over public internet and private network within the organisation.
Step 2: Now create the server SSL certificates using CA keys, certs and server csr. This will create server-key.pem (Private key) and server.pem (Certificates) files.
cfssl gencert \
  -ca=ca.pem \
  -ca-key=ca-key.pem \
  -config=ca-config.json \
  -profile=web-servers \
  server-csr.json | cfssljson -bare server