Kubernetes offers one of the most efficient autoscaling mechanisms through the Horizontal Pod Autoscaler (HPA). HPA is also included in the CKA exam.
In this guide, we will explore how HPA works, how it calculates the desired number of replicas, and how to set it up step by step with a practical example using an NGINX Deployment.
What is Horizontal Pod Autoscaler?
The Horizontal Pod Autoscaler (HPA) automatically scales the number of Pods in a Kubernetes workload (such as Deployments, StatefulSets, or ReplicaSets) based on observed metrics like CPU or memory usage.
For example, if the target CPU utilization is set to 50%, the HPA will add more Pods when usage goes above 50% and reduce Pods when it drops below that target.
How Does HPA Work?
The diagram below shows the workflow of the HPA.
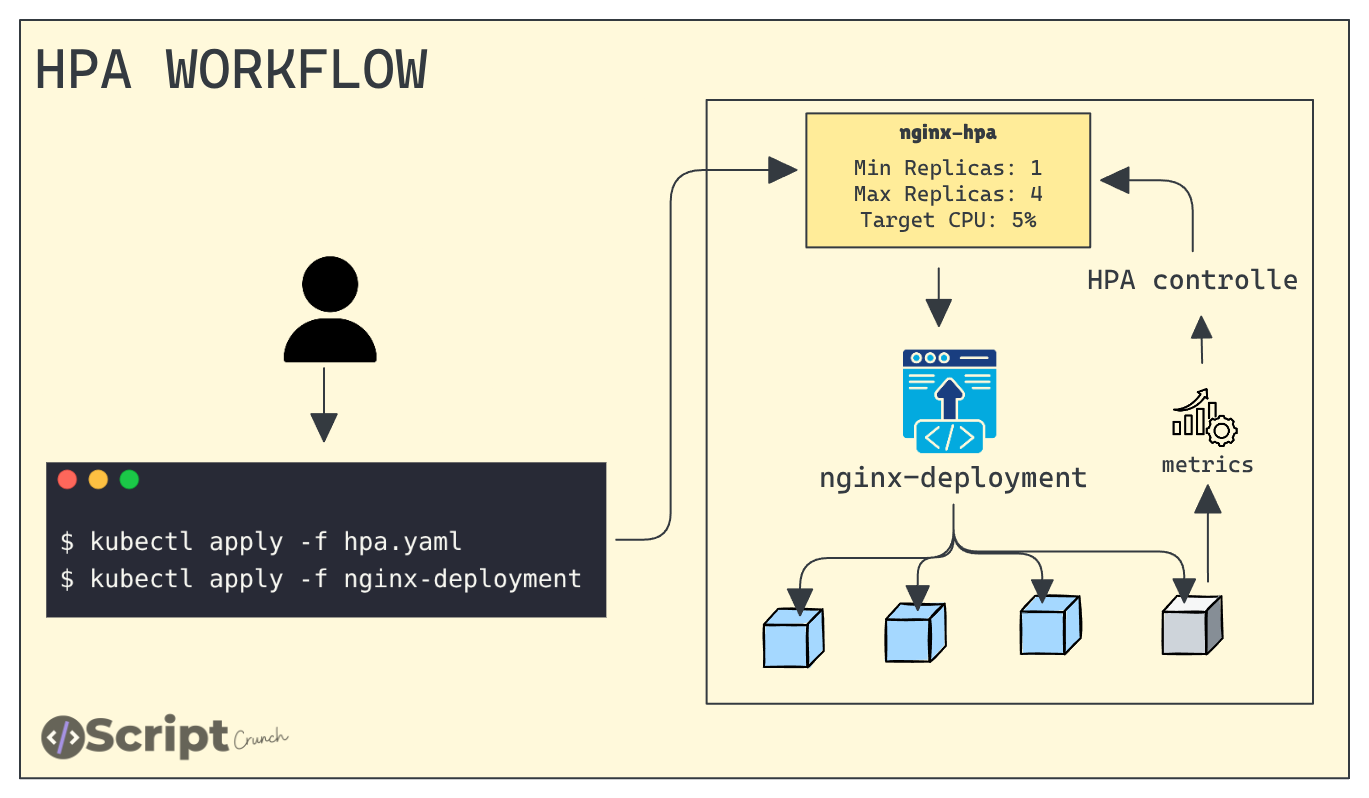
To explain how this works, first we create an HPA object that targets a Deployment and specify the name of that Deployment.
For example, we will use an nginx-deployment. We also define how many replicas the HPA can scale up to and how far it can scale down on CPU usage.
The HPA controller monitors the metrics (via the metrics-server) for the targeted resource, such as a deployment. It compares the current resource usage with the target utilization and automatically adjusts the replica count.
This check happens every 15 seconds, and the controller waits around 5 minutes before scaling down to avoid frequent scaling events.
How Does HPA Calculate the Required Number of Replicas?
The scaling decision is based on the following formula:
desiredReplicas = ceil(currentReplicas × currentMetricValue / desiredMetricValue)Example:
If there are 3 Pods with 80% CPU usage and the target is 50%,:
desiredReplicas = ceil(3 × 80 / 50)
                = ceil(4.8)
                = 5 pods
Here, ceil means “round up to the nearest whole number.”
So, HPA will scale up the Pods until it reaches the maxReplicas value defined in the HPA configuration.
Hands-on Example
Let us understand this with a practical example.
Step 1: Verify the metrics server
First, verify that the metrics server is running in the cluster, because the HPA controller gets its metrics from there.
Run the following command:
kubectl top nodesOutput:
# kubectl top nodes
NAME           CPU(cores)   CPU(%)   MEMORY(bytes)   MEMORY(%)
controlplane   135m         6%       1406Mi          37%
node01         44m          4%       720Mi           38%
node02         72m          7%       915Mi           49%
Output of top command
From this output, we can see the CPU and memory usage of our nodes.
Step 2: Deploy NGINX
Now, we will deploy the NGINX web server.
Copy the following manifest and apply it to the cluster
cat <<EOF > nginx-deployment.yaml
apiVersion: apps/v1
kind: Deployment
metadata:
  name: nginx-deployment
spec:
  selector:
    matchLabels:
      app: nginx
  replicas: 2
  template:
    metadata:
      labels:
        app: nginx
    spec:
      containers:
      - name: nginx
        image: nginx:latest
        ports:
        - containerPort: 80
        resources:
          requests:
            cpu: "100m"
            memory: "128Mi"
          limits:
            cpu: "250m"
            memory: "256Mi"
---
apiVersion: v1
kind: Service
metadata:
  name: nginx-service
spec:
  selector:
    app: nginx
  type: NodePort
  ports:
    - port: 80
      targetPort: 80
      nodePort: 32000
EOF
Run the following command:
kubectl apply -f nginx-deployment.yamlOnce it is deployed, verify that it is running
Output:
# kubectl get po
NAME                                READY   STATUS    RESTARTS   AGE
nginx-deployment-7554bc5d7b-d7xt9   1/1     Running   0          84s
nginx-deployment-7554bc5d7b-m7qtj   1/1     Running   0          84s
This output shows that the NGINX web server is running successfully
Step 3: Create an HPA for the NGINX web server
Now,2 we will create a HorizontalPodAutoscaler that targets the NGINX Deployment. We want the Deployment to scale between 1 and 3 replicas and maintain an average CPU utilization of 60%.
cat <<EOF | kubectl apply -f -
apiVersion: autoscaling/v1
kind: HorizontalPodAutoscaler
metadata:
  name: nginx-hpa
spec:
  scaleTargetRef:
    apiVersion: apps/v1
    kind: Deployment
    name: nginx-deployment
  minReplicas: 1
  maxReplicas: 3
  targetCPUUtilizationPercentage: 60
EOF
The scaleTargetRef tells Kubernetes which object the HPA should scale. In this case, the object type is a Deployment, and its name is nginx-deployment.
We can also define the minimum and maximum number of Pods that the HPA is allowed to scale to. Along with that, we specify how much CPU (in percentage) should be used as the target for scaling.
Once it is applied, verify it by running the following command
kubectl get hpaOutput:
# kubectl get hpa
NAME        REFERENCE                     TARGETS       MINPODS   MAXPODS   REPLICAS   AGE
nginx-hpa   Deployment/nginx-deployment   cpu: 0%/60%   1         3         2          114s
This output of HPA
Here, you can see the Target column showing 0% to 60%, and the minimum and maximum Pod counts are 1 and 3, which is exactly what we configured
Step 4: Test Autoscaling
Now, let’s generate load and see if the number of NGINX Pods increases.
We will use the hey utility to continuously send HTTP requests to the NGINX service.
Run the following command:
kubectl run load-generator \
  --image=techiescamp/hey:latest \
  --restart=Never \
  -- -c 100 -q 50 -z 60m http://nginx-service.default.svc.cluster.local
Output:
# kubectl get hpa -w
NAME        REFERENCE                     TARGETS       MINPODS   MAXPODS   REPLICAS   AGE
nginx-hpa   Deployment/nginx-deployment   cpu: 0%/60%   1         3         1          25m
nginx-hpa   Deployment/nginx-deployment   cpu: 221%/60%   1         3         1          26m
nginx-hpa   Deployment/nginx-deployment   cpu: 243%/60%   1         3         3          26m
Initially, there was only one replica. As CPU usage increased beyond 60%, the HPA scaled the Pods up.
It did not scale beyond three replicas because the maximum Pod count was set to 3 in the HPA configuration.
# kubectl get hpa
NAME        REFERENCE                     TARGETS       MINPODS   MAXPODS   REPLICAS   AGE
nginx-hpa   Deployment/nginx-deployment   cpu: 0%/60%   1         3         1          36m
Once the load is removed, HPA automatically scales the replicas down after around 5 minutes.
Conclusion
The Horizontal Pod Autoscaler is one of Kubernetes’ most powerful features for maintaining performance and efficiency. With just a few configurations, it also plays an important role in CKA exam preparation.